Sunday, April 13, 2025

edge will automatic load other browser tabs

 If you ever face on when open edge it will load your chrome browser tab. I had face this issue these couples of day, and search on solution. 


Solution: 

Step1: open edge and type this in browser: edge://settings/profiles/importBrowsingData


Step2: click on Import data from Google Chrome, and turn off 


reference: https://answers.microsoft.com/en-us/microsoftedge/forum/all/how-to-stop-edge-from-opening-tabs-from-other/ef57d4c3-851f-4363-8b05-2ee4141aa8c2


Monday, October 14, 2024

Network and Internet process flow

 If you were to be ask how does the Internet work, or how does the OSI 7 Layer work? Does anyone know how it work. I would like to share this knowledge, couple of weeks I had an interview and was asked, but in that time i can't remember. So after studying how it works, i would like to write a note on it. The topology look like this if you have a laptop or PC how does it access to internet. 


To summarize the packet flow it would be like this: 

- DHCP Traffic: Helps establish network settings (IP address, gateway, DNS server).
- ARP Traffic: Maps IP addresses to MAC addresses.
- PPPoE (if used): Authentication and connection setup with ISP.
- DNS Traffic: Resolving domain names.
- TCP/UDP Traffic: Actual data transfer, such as web browsing or streaming (HTTP, HTTPS, or other protocols).

Let me explain in more detail:

Step1. initial CPE connection: 
CPE connects to AP, which will establish a Layer 2 connection (Ethernet/Wi-Fi).

Step2: DHCP request(Layer3):
CPE will try to obtain an IP address from the DHCP server via the AP with Discover/Offer/Request/Ack. 
  • The CPE will try to obtain an IP address from the DHCP server via the AP.
  • CPE → AP: The CPE sends a DHCP Discover message to request an IP address from the local DHCP server on the AP (or router).
  • AP → CPE: The AP (or router) provides an IP address (via DHCP Offer) to the CPE, which allows the CPE to communicate on the local network. It also assigns other configuration details like the Default Gateway and DNS server.
  • CPE → AP: The CPE sends a DHCP Request to confirm the offer.
  • AP → CPE: The AP acknowledges with a DHCP Acknowledgment.

  • Step3: ARP requests/Replies (layer2)
    You might also see ARP (Address Resolution Protocol) to map IP addresses to MAC addresses.

    Step4 CPE to ADSL Modem like  (PPP/PPPoE) (Layer2 and Layer3)  [optional]

    PPOE is Layer 2 for session establishment and Layer 3 for carrying IP traffic.

    For PPOE layer2 and layer3
    PPPoE operates at Layer 2 by encapsulating PPP frames within Ethernet frames. It manages the connection setup, session management, and teardown over Ethernet networks

    Once the session is established, Layer 3 traffic, such as IP packets, can be transmitted through the PPPoE connection. So, the data traffic (e.g., internet traffic) happens over Layer 3.

    ADSL(Layer1+layer2):

    ADSL operates at Layer 1 (Physical Layer), as it modulates and demodulates digital signals over copper telephone lines. It provides the physical connection for transmitting data.

    ADSL is typically paired with protocols like ATM (Asynchronous Transfer Mode) or PPPoE at Layer 2, allowing for data to be framed and managed over the connection.

    Step5: NAT (Network Address Translation) (layer3)
    NAT at AP or ADSL: If the CPE is behind a router or ADSL modem that uses NAT, the private IP address assigned to the CPE (from DHCP) gets translated to the public IP address of the ADSL modem before reaching the internet. NAT allows multiple devices on the local network to share a single public IP.
  • Outbound Packets:
    • When the CPE sends packets to external websites (e.g., HTTP/HTTPS requests), the packets will be passed to the NAT device (usually in the router or ADSL modem) and rewritten with the public IP address.
  • Inbound Packets:
    • Replies from external servers (such as web pages loading) will go through NAT and be translated back to the CPE's private IP.

  • Step6: DNS Resolution (layer7)
    CPE querying a DNS server to resolve domain names (e.g., www.example.com) into IP addresses.

  • CPE → DNS Server: When the CPE (or devices behind it) needs to access a website, it performs a DNS query. It asks the DNS server (provided in the DHCP step) to resolve the domain name (e.g., www.google.com) into an IP address.
  • DNS Server Response: The DNS server responds with the IP address of the requested domain

  • Step7 HTTP/HTTPS Traffic:
    When browsing the internet, you will see HTTP/HTTPS request-response traffic between the CPE and external websites or services


    Summary:
    So this is the full flow process for your CPE(laptop or mobile)  access to the internet. When you are at home it's basically using the topology I showed above, and you can use it to debug also. 

    This is an interview question I had earlier, which I didn't made it, so I would like to make a note on it. In case if you're interesting on how does your PC able to access to Internet this is a great example. 

    Sunday, March 20, 2022

    PXE setup

     I have write a PXE setup in my medium blog. If you’re interested on setting pxe boot under window and Ubuntu please refer link: https://medium.com/jacklee26/set-up-pxe-server-on-ubuntu20-04-and-window-10-e69733c1de87


    Saturday, October 23, 2021

    visual studio code is supporting online

     VSCode is supporting online, you can use it by your web browser, it's great.

    please access below link to : https://vscode.dev/


    Saturday, September 18, 2021

    WIFI knowledge

     WIFI Knowledge

    802.11 Association Process


    1. Beacon
    The access point periodically sends a beacon frame (every 100ms )to announce its presence and relay many information that is required by the stations to connect to the wireless network

    STA begins the process by performing a passive or active scan. In the passive mode, the STA is listening for beacons from an access point. The beacon frame contains the BSSID which is the MAC address of the radio sourcing from the access point.

    Beacon packet contains capability information and parameters.

    2. Probe Request

    Probe requests advertise the mobile stations supported data rates and 802.11 capabilities such as 802.11n.

    A probe is sourced from the STA requesting to join a wireless network.  The probe is responded by an access point using a probe response management frame. Probe request from a STA broadcasted to any access point that can respond. 

    3. Probe Response:

    APs receiving the probe request check to see if the mobile station has at least one common supported data rate.  If they have compatible data rates, a probe response is sent advertising the SSID (wireless network name), supported data rates, encryption types if required, and other 802.11 capabilities of the AP.


    4. Authenticated Request

    The station chooses a SSID/network from the probe responses it receives. It also checks the compatibility on encryption type. Once compatible networks are discovered the station will attempt low-level 802.11 authentication with compatible access points. The station sends a low-level 802.11 authentication frame to an AP setting the authentication to open and the sequence to 0x0001.

    If you noticed in the above successful authentication frame, the Authentication Algorithm was set to Open System. There are two types of methods for authentication.

    • Open System: WPA, WPA2 with  no password, performs no client verification. 
    • Shared Key:  passphrase and contains a 4-way handshake for authentication. The STA sends a request to authenticate, access point receives the request and sends back a cleartext challenge, the STA encrypts and sends another authentication request based on the cleartext challenge and then the access point compares the STA’s challenge to the text. If successful, the STA is authenticated.

    5. Authenticated Response

    STA can be in either two states in Authentication and Association:

    • Unauthenticated or authenticated.
    • Unassociated or associated.

    The access point receives the authentication frame and responds to the station with authentication frame set to open indicating a sequence,  If an access point receives any frame other than an authentication or probe request from a station that is not authenticated it will respond with a deauthentication frame placing the mobile into an unauthenticated an unassociated state. The station will have to begin the association process from the low level authentication step. At this point the station is authenticated but not yet associated


    6. Association Request

    Once the station determines which access point it would like to associate to, it will send an association request to that access point. The association request contains chosen encryption types and other compatible 802.11 capabilities.


    7. Association Response

     If the elements of the association request match the capabilities of the access point, it will create an Association ID for the mobile station and  respond with an association response with a success message granting network access to the mobile station. 

     Association Response includes:

    • Capabilities Information such as
    • Supported Data Rates
    • HT Capabilities
    • HT Information such as the Primary Channel
    • WMM information


    WPA personal vs enterprise

    WPA Personal(WPA-PSK): 
    Using a password which is often used on home networks such as wifi routers or AP. You can just access to AP and changed the password, when STA connects AP, just type in the password you set. one password applies to all users, and it should be manually changed by the client. 
    WPA Enterprise : 
    This work on enterprise or work on a business network /environment.  This mode needs deploy by a radius server, and it supports 802.1x authentication. So we need a shared key for the radius client and server to communicate, and then we also need to have an account and password which is provided in the radius server. The account and password only administrator is able to change, the client is unable to change the password. This is good for if a person left position, we can just delete this personal account from the database. 

    Share key:


    key in  account and password 


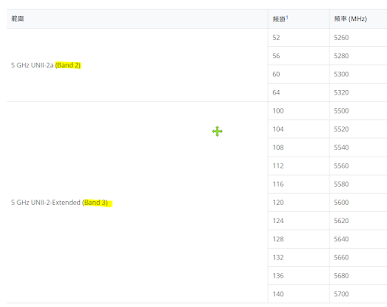
    DFS Dynamic Frequency Selection


    It's a mechanism to allow unlicensed devices, especially5GHz frequency bands which have been allocated to radar systems without causing interference to those radars. With DFS function enabled, the devices will monitor the frequency they are using for radar signals. If radar signals are detected on the current channel, the devices will  switch to an alternate channel automatically.In addition, the channel in which radars are detected will not be used for a period of time, If 5GHZ devices with DFS function enabled choose a DFS channel before operation, the devices will detect radar signals for a period of time (about 1 or 10 minutes).

    If the device is already operating on a DFS channel and radar signals are detected you will encounter disconnection, however the connection can be restored after a while. But you may see the change in the operating channel.


    resource:

    https://wifibond.com/2017/04/08/802-11-association-process/
    https://documentation.meraki.com/MR/WiFi_Basics_and_Best_Practices/802.11_Association_Process_Explained
    https://packet6.com/802-11-state-machine/

    Saturday, August 7, 2021

    Markdown on medium

    Today I would like to shar on how to use some MD in medium, some markdown might not work the same in githb. 


    Write code use the command to switch:

    • Windows : ctrl+alt+6
    • Mac : command+ option+6
    • Linux : ctrl+alt+6


    Markdown with code single line:  `code `
    Markdown with multiply line:  ```code ```
    Slice line: is quite different, the normal way is ~~text~~, but Medium need to go to web and generate it. 
    https://www.piliapp.com/cool-text/strikethrough-text/
    https://fsymbols.com/generators/strikethrough/


    Saturday, July 31, 2021

    selenium scroll

     his is a HTML :

    reference: https://michaeljsanders.com/2017/05/12/scrapin-and-scrollin.html

    import time
    from selenium import webdriver
    from bs4 import BeautifulSoup as bs
    # I used Firefox; you can use whichever browser you like.
    browser = webdriver.Chrome()
    # Tell Selenium to get the URL you're interested in.
    browser.get("http://URLHERE.com")
    # Selenium script to scroll to the bottom, wait 3 seconds for the next batch of data to load, then continue scrolling.  It will continue to do this until the page stops loading new data.
    lenOfPage = browser.execute_script("window.scrollTo(0, document.body.scrollHeight);var lenOfPage=document.body.scrollHeight;return lenOfPage;")
        match=False
            while(match==False):
                    lastCount = lenOfPage
                    time.sleep(3)
                    lenOfPage = browser.execute_script("window.scrollTo(0, document.body.scrollHeight);var lenOfPage=document.body.scrollHeight;return lenOfPage;")
                    if lastCount==lenOfPage:
                        match=True
    # Now that the page is fully scrolled, grab the source code.
    source_data = browser.page_source
    # Throw your source into BeautifulSoup and start parsing!
    bs_data = bs(source_data)


    Sunday, July 11, 2021

    conda not found in MAC

     Have you ever see an issue in MAC when Anaconda is been installed propely and the conda is place correctly but still conda will be not found. I'm going to teach you how to solve this issue: 


    Part1 In case you don't know how to add CONA to PATH

    Note: Mac Anaonda is been save in /opt/anaconda3

    1. Edit vim ~/.bash_profile

    export PATH="/opt/anaconda3/bin:$PATH"

    2. wq! or x! to save it 

    3. source ~/.bash_profile

    4. you can check PATH  by:   echo $PATH

    conda --version

    6 open a new terminal and enter conda --version will occur command not found 

    Part 2 Terminal running conda 

    To solve this issue we basely have to just touh a file. In MAC default it uses zshrc

    Method1:  

    1. touch ~/.zshrc 

    2. edit it 

    source ~/.bash_profile

    3. save it by wq! or x!

    4. open new terminal and press coda--version will fix this problem


    Method2: 

    1. go to system preferences>user&groups> 

    2. unlock your setting 

    3 click on a username and right-click and select advance option

    4. login shell changed to /bin/bash will fix this

    Saturday, May 15, 2021

    Selenium Xpath


     Today I wants to share Xpath using selenium. Xpath is a unique tool, which is better than other finding_element. These are the following element you can use:

    find_element_by_id
    find_element_by_name
    find_element_by_xpath
    find_element_by_link_text
    find_element_by_partial_link_text
    find_element_by_tag_name
    find_element_by_class_name
    find_element_by_css_selector

    or multiply element 

    find_elements_by_id
    find_elements_by_name
    find_elements_by_xpath
    find_elements_by_link_text
    find_elements_by_partial_link_text
    find_elements_by_tag_name
    find_elements_by_class_name
    find_elements_by_css_selector


    I think to know XPath is really important.

    The syntax of it is: 

    Xpath=//tagname[@attribute='value']

    This is a HTML :

    <html>
     <body>
      <p>Are you sure you want to do this?</p>
      <a href="continue.html">Continue</a>
      <a href="cancel.html">Cancel</a>
      <form id="loginForm">
        <input name="username" type="text" />
        <input name="password" type="password" />
        <input name="continue" type="submit" value="Login" />
        <input name="continue" type="button" value="Clear" />
        <div class="search">
          This is new page<h1>Hello</h1>!!!!!
        </div>
    </form>
    </body>
    </html>

    • If you want to get the name for the username, you can try like this:

    //input[@name='username']

    • using chrome development tool to get xpath. The [1] is username, [2] is password ....[4]

    //*[@id="loginForm"]/input[1]
    //*[@id="loginForm"]//input[@name="username"]

    • Full path using chrome development tool

    /html/body/form/input[1]

    you can see the input name for clear and login is the same "continue", if we want to get the clear button:

    //input[@name='continue'][@type='button']

    or

    //*[@id="loginForm"]/input[4]


    You can also use some function text(), or contain

    If you use JUST text(), the string must be the same, else won't find it

     //*[text()="str"]
     //*[contains(text(),'str')]

    if I want to find "continue", I can use this:

    //*[text()="Continue"]

    or 

     //*[text()="Cont"] 

    using (dot)

    Sometimes when you used  text() or contain() to find, but will not be able to find, you can use this method:

    For example, this is Instagram following text, which can't find the following, you have to use this method. 


    //*[text()[contains(.,'str')]]

    //*[contains(.,'str')]


    this will search from the root to the current node. 

    Selenium with Xpath

    inorder to use in selenium you have to use like this|:

    driver.find_element_by_xpath('put-your-xpath-here').click()


    Sunday, January 3, 2021

    download VIDEO STREAMING tool

     There are many different type of download video streaming tool.  I believe many people used it before, but I still wants to share it to you. 


    Before introduce this tool, I would like to teach how to capture video streaming file from browse. I believe from people would know that when I mention about browser you would reflect it to devtool, well that's right. I am using the devtool to teach how to capture the stream, which is pretty good tool to used.


    I like to used YouTube as an example, please notice that youtube steaming split the audio and video stream into two part, the file for video will be webm, and audio would be weba. 

    Today many web development's security are improvement, some site would not be easy to capture. 

    Procedure: 

    1. Lauch your site to youtube and click any video you like

    2. left click and presss "inspect"

    3. go to "network" and go to xhR 

    you can see there is a playlist, click on it, you will see the url requst, and content type to make sure it's video type. Note that each pair will have one video one audio stream. 

    4. select the url and right click to direct to the page and download it. (downlaod both audio and video)


    The next thing I wants to intoduce the tool, whic is FFMPEG, this is an oepnsource tool, but it's not GUI, you need to type this command. This tool is to convert the file to any format you like. If you have a mp4 file, and can also convert to mp3. You don't have to used any other tool. 

    Got to this page to download it: https://ffmpeg.org/download.html

    You can click on documentation to understand more command. 

    I will only teach you 2 command: 

    1. convert single file: ffmpeg -i filename xxx.[mp3 or mp4 or any file you want)

    ffmpeg -i video.mp4 mysong.mp3

    2. convert audio and video and merge into one file. 

    ffmpeg -i video.webm -i audio.weba -c:v copy -c:a aac myvideo.mp4

    After you know the command, and download ffmpeg tool, put the two file you download from youtube and copy it into the same directory and used the second command will be able to see the video. 

    But there is another tool you can use it's much easier, called youtube-dl, command is youtube-dl "youtube url" that's it, you don't need to open devtool. 


    Thursday, December 17, 2020

    scanning port (NMAP)


    TCP:

    nmap -v -sT -T2 -Pn -p T:5060,111,65431,44318,4159,80,443,53 IPv4-Address

    nmap -v -sT -T2 -Pn -p T:52224,705,111,51413,37915,4159,22,23 -6 IPv6-Address

    UDP:

    nmap -v -sU -T2 -Pn -p U:1293,111,161,162,3000,5060,546,53  IPv4-Address

    nmap -v -sU -T2 -Pn -p U:1293,111,2427,161,162,3000,546 -6  IPv6-Address


    hping IP Flood attack to DUT


     1. Connect a LAN PC to DUT via ethernet. Do " ping  8.8.8.8 -t" and access websites, can success.

    2. Use hping3 command " hping3 -S -P -U --flood -V --rand-source DUT-IP" ( DUT's  IP) to attack DUT WAN IP.

    3. After a while, no more than 1 minutes, LAN PC can not ping successfully, and can not access internet.

    4. Use hping3 command "hping3 -1 --flood -V target" generate icmp flood to attack DUT WAN IP.

    5. After a while, LAN PC can not ping successfully, and can not access internet.

    Monday, June 22, 2020

    pyhton error Anaconda3

    if you run python see this problem related to Anaconda3
    Anaconda3\lib\site-packages\numpy\__init__.py:140: UserWarning: mkl-service package failed to import, therefore Intel(R) MKL initialization ensuring its correct out-of-the box operation under condition when Gnu OpenMP had already been loaded by Python process is not assured. Please install mkl-service package, see http://github.com/IntelPython/mkl-service

    Solution:
    go to environment setting and add this in it: C:\Users\username\Anaconda3\Library\bin

    Sunday, June 7, 2020

    python with database


    import sqlite3
    conn = sqlite3.connect('D:\\hskio_python.db')
    try:
        info = []
        cur = conn.cursor()
        rows = cur.execute('select * from person')
        for row in rows:
            id = row[0]
            hei ght = row[2]
            weight = row[3]
            bmi = round(weight/height**2, 2)
            print(id, height, weight, bmi)
            info.append([bmi, id])
        for data in info:
            cur.execute('update person set bmi=%d where id=%d' % (data[0], data[1]))
        conn.commit()
        
    finally:
        conn.close()


    beautifulsoup example

     beautifulsoup example 

    Find and Findall Parameter:


    findAll(tag, attributes, recursive, text, limit, keywords) find(tag, attributes, recursive, text, keywords)

    Find Parameter: 
     beautifulsoup example  Find h1 tag
    import requests
    from bs4 import BeautifulSoup
    resp=requests.get("https://code-gym.github.io/spider_demo/")
    soup=BeautifulSoup(resp.text, 'html5lib')
    print(soup.find('h1'))
    

    beautifulsoup print with tag and without

    With tag 
    print(soup.find('h1'))

    Without tag 
    print(soup.h1)

    Findall parameter: 


    for h3 in soup.find_all('h3'): print(h3)

    Find class name
    for title in soup.find_all('h3','post-title'): print(title)


    beautifulsoup crawl ptt sock

    去ptt 股票爬文章


    import requests
    from bs4 import BeautifulSoup
    import time
    today = time.strftime('%m/%d').lstrip('0')
    
    def ptt(url):
        resp = requests.get(url)
        if resp.status_code != 200:
            print('URL發生錯誤:' + url)
            return
        soup = BeautifulSoup(resp.text, 'html5lib')
        paging = soup.find('div', 'btn-group btn-group-paging').find_all('a')[1]['href']
    
        articles = []
        rents = soup.find_all('div', 'r-ent')
    
        for rent in rents:
            title = rent.find('div', 'title').text.strip()
            count = rent.find('div', 'nrec').text.strip()
            date = rent.find('div', 'meta').find('div', 'date').text.strip()
            article = '%s %s:%s' % (date, count, title)
    
            try:
                if today == date and int(count) > 10:
                    articles.append(article)
            except:
                if today == date and count == '爆':
                    articles.append(article)
        if len(articles) != 0:
            for article in articles:
                print(article)
            ptt('https://www.ptt.cc' + paging)
        else:
            return
    
    ptt('https://www.ptt.cc/bbs/Stock/index.html')

    Thursday, June 4, 2020

    python changed pip

    if our install pyton2 and python3 on your PC, it might used python2's pip. you can used the command

    pip --version
    D:\selenium-3.141.0.tar\dist\selenium-3.141.0>pip --version
    pip 20.1.1 from c:\python27\lib\site-packages\pip (python 2.7)

    you can also do like this :
    #python36\Scripts\pip.exe install packagename
    Example:
    C:\python37\Scripts>pip3.exe install packagename

    reference:
    https://stackoverflow.com/questions/39851566/using-pip-on-windows-installed-with-both-python-2-7-and-3-5
    https://stackoverflow.com/questions/40832533/pip-or-pip3-to-install-packages-for-python-3

    selenium problem

    This is a interesting topic and funny thing about selenium, after surfing on the net, i find this article which really solve the problem.


    Problem: Used pip to install selenium and show install success. But module ONLY work on Python2 BUT Python3 DON'T work. Sound really strange, isn't.  
    Solution: So just download selenium package and manual install. 
    How: Just extract the file and go to the directory and used the command will install:
    python
    Conclusion is we have to manual install selenium .